
BME offers several picture effects. Some of these are part of the program, while others are external effects modules. Effects modules are similar to import/export filters. Those stored in the SoftLogik:Effects folder when BME is started are appended to the bottom of the Effects menu.
The effects discussed in this section can be applied to the entire picture or just to a selected area. If an area is selected and you want to apply the effect to the entire picture, deselect the area before choosing the command.
Some effects cannot be applied to certain types of pictures. Such restrictions are explained in the following paragraphs.
You may need to flip a picture to make it work in your layout. BME can flip a picture or area horizontally or vertically.
To flip an area or a picture: Select an area to flip, or deselect a selected area if you want to flip the entire picture. Choose the Horizontal or Vertical items from the Flip submenu in the Effects menu.BME also allows you to rotate pictures in 90 degree increments. If you need finer control, you should rotate the picture in PageStream before printing. Like flipping, rotation is provided in BME as a way to change the picture itself instead of a picture's frame as in PageStream.
To rotate an area or picture: Select an area to rotate, or deselect a selected area if you want to rotate the entire picture. Choose the 90° Clockwise, 90° Counterclockwise or 180° command from the Rotate submenu of the Effects menu to rotate it.
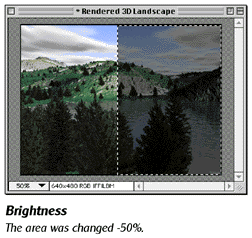
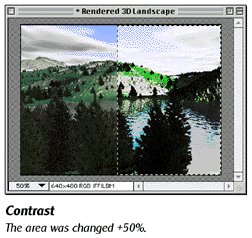
BME can adjust the brightness and contrast of a picture or selected area. Increasing the contrast will make the colors differ more sharply, while decreasing the contrast will make them more similar. Changing the brightness makes all the colors brighter or darker without changing their relative brightness. You cannot adjust the contrast or brightness for black and white and palette pictures.
To adjust the brightness or contrast of an area or picture: Select an area to change, or deselect a selected area if you want to change the entire picture. Choose the Contrast or Brightness command of the Effects menu to open the appropriate dialog box. Drag the slider to the desire position and click on Perform.
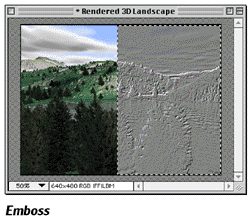
This effect makes the picture look as if it was engraved in stone. You cannot apply this effect to black and white and palette pictures.
To emboss an area or picture: Select an area to emboss, or deselect a selected area if you want to emboss the entire picture. Choose the Emboss command of the Effects menu.
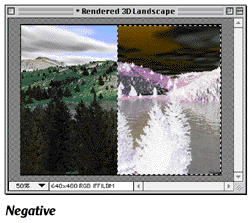
BME can invert the colors of a selected area or picture to create a negative of it. This is most useful in greyscale and black and white pictures, although you can make any picture a negative except palette pictures.
To make an area or picture negative: Select an area to change, or deselect a selected area if you want to change the entire picture. Choose the Negative command from the Effects menu.
The pixelize effect breaks up a picture into blocks of pixels to make the picture jaggier. The Pixelize dialog box allows you to set the size of these blocks, or cells, and how the color for each is chosen. For example, if you set a cell size of 6, then each cell will be make up of 36 pixels (6x6).
To pixelize an area or picture: Select an area to change, or deselect a selected area if you want to change the entire picture. Choose the Pixelize command from the Effects menu to open the Pixelize dialog box. Drag the slider to set the cell size and set how to calculate the color of each cell with the Cell Color pop-up. This is explained below:
- Average: Uses the average of all the colors in the cell.
- Center: Uses the color of the pixel in the center of the cell.
- Maximum: Uses the maximum color value in the cell.
- Minimum: Uses the minimum color value in the cell.
- Random: Picks a random color from the cell's pixels.
- Upper left: Uses the color of the pixel at the upper left corner of the cell.
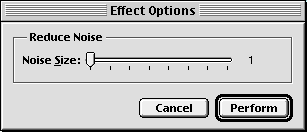
If you scan a picture, you may wish to clean it up before using or tracing it. Scanning can create a picture with noise, or random pixels that are not part of the picture. Noise reduction removes clusters or pixels below a specified size. This is especially useful for autotracing so that you can trace the actual picture without tracing undesired pixels.
Ensure that you do not set the number of pixels to eliminate larger than important picture data when you are reducing background noise.
To reduce noise in an area or picture: Select an area to change, or deselect a selected area if you want to change the entire picture. Choose the Reduce Noise command from the Effects menu to open the Reduce Noise dialog box. Drag the slider the set the maximum number of pixels in a cluster to remove. Click on Perform.
This effect sharpens the edges of pictures. It is particularly effective in pictures that appear blurry. Black and white and palette pictures cannot be sharpened.
To sharpen an area or picture: Select an area to change, or deselect a selected area if you want to change the entire picture. Choose the Sharpen command from the Effects menu.
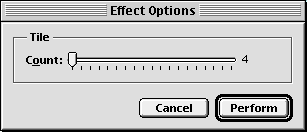
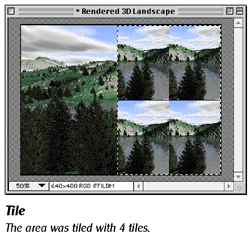
This effect tiles the picture an equal number of tiles vertically and horizontally. Any picture type can be tiled.
To tile an area or picture: Select an area to tile, or deselect a selected area if you want to tile the entire picture. Choose the Tile command from the Effects menu to open the Tile dialog box. Drag the slider to set the number of tiles you want in the picture area. Click on Perform.
Because of the open architecture of BME, additional effects can be added by installing them in the Effects folder. SoftLogik released a collection of picture effects, called Gary's Effects, that will allow you to obtain just the right look for your pictures. This useful add-on offers, among other effects: Average, Blur, Gamma, Hue and Saturation, Threshold and even a versatile Convolve feature. See the Contacting SoftLogik section to get information about ordering this collection of effects.
![]()
Previous section: Resizing
Next section: Undo
Exit: Table of Contents